Wednesday, June 23, 2010

Oyakodon (chicken and egg rice bowl) recipe


Oyakodon (chicken and egg rice bowl or chicken and egg donburi) is another staple in Japanese restaurants which you can prepare at home. It's a comfort food for me since I love chicken. There are other ways of doing this dish but here is my recipe, combined from several versions of recipes found on the internet. Please feel free to estimate the ingredients as most of the time I don't measure when I cook. LOL.

How I cook my oyakodon:

Prepare your boneless chicken pieces and season with salt and pepper. You have the option of dipping them in flour. Fry the chicken until almost cooked and get rid of excess oil.

Next, saute the onions until transparent. Add soup or chicken stock and slowly simmer.Dashi is preferred, but in its absence, try mixing soy sauce, grown sugar, Japanese sake and mirin in the right quantities to make your stock/sauce. Add chicken pieces and let boil again until flavor of the soup is absorbed.

In the meantime, beat the eggs and add to the chicken mixture. Eggs should still be tender, not overcooked, when transferred to the steaming hot bowl of steamed rice. Top with chopped green onions, if desired.

Sunday, June 20, 2010

Katsudon recipe


Japanese food is most people's favorite, but it can get quite expensive. Here is one fool-proof recipe to satiate your craving for katsudon which is one of the most popular Japanese dishes. Veer away from the usual lunch or dinner and serve this on the table. You are likely to elicit praises for a dish which is quite easy to make ;)

Ingredients:

Four pork chops, preferably boneless
Black pepper to taste
2-3 tbsps. flour
one egg
1-2 cups panko or breadcrumbs
Cooking oil for frying

One large onion
1 tbsp. sesame oil
four to five eggs
leeks or green onion, chopped
dry seaweed or nori

For sauce:

1 tbsp. sugar
50 ml. Japanese sake
50 ml. mirin
50 ml soy sauce
100 ml. dashi or soup stock

Procedure:

1. Make shallow cuts along the rim of the prok chops to prevent them from contracting. Sprinkle with black pepper and dip in the following order: flour, beaten egg then the panko or bread crumbs.

Deep fry pork chops. Once cooked, cut in serving size while still hot.

2. Slice the onion and fry in the sesame oil until they become transparent. Pour sake, mirin, sugar, soy sauce and the dashi to the onions and bring to a boil. Add the tonkatsu slices and simmer for a few minutes.

3. Lower the fire so the sauce doesn't evaporate. Add the well-beaten eggs and onions. Eggs should not be too cooked.

4. Put katsudon on top of a bowl of steamed rice and heap with more sauce. Serve hot.


Sunday, June 13, 2010

Sticky date pudding recipe

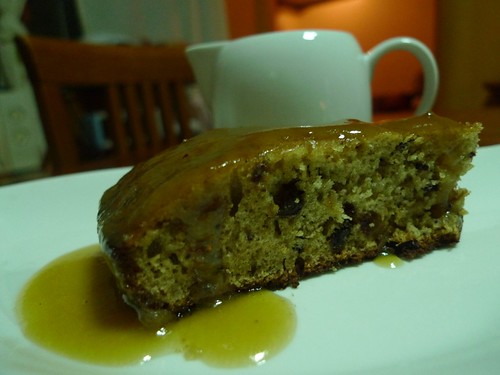
I used to believe that I am not a pudding person, until I tasted the sticky toffee pudding with caramel sauce in Cafe Juanita. It was love at first bite, and I decided to look for similar recipes. I have the Assumption High School Class of '79 Cookbook (Pearl Edition) and found a related recipe for Sticky Date Pudding by Marivic Puyat Limcaoco. Okay, this may not be as moist as the Cafe Juanita version but it's also good. My only problem was finding dates in the grocery ~ good thing the hubby found me a huge jar in the Metro Gaisano grocery in The Fort's Market!Market!

Btw, this cake is great with coffee!

Sticky date pudding


1. Put 170 grams pitted dates in a bowl, sprinkle with 1 tsp. baking soda, pour with about 1 1/4 cups boiling water then set aside.

2. Cream 1/4 cup unsalted butter and 3/4 cup brown sugar - approximately five minutes.

3. In another bowl, beat together two eggs and 1/2 teaspoon pure vanilla. Add half of the egg mixture into the butter mixture and beat until fully mixed. Add remainder of the egg mixture and mix well again.

4. When done, add 1 1/4 cups self-raising flour and mix at low speed. (In the absence of self raising flour, substitute with the same amount of all purpose flour, then add 1 1/2 tsp. baking powder and 1/2 tsp. salt.)
Fold in dates. Pour batter in greased loaf pan, bundt pan or 8-inch round pan.

5.Bake in preheated 360F oven for 25 minutes or until done (insert toothpick in center to check doneness).

6. In the meantime, make caramel sauce by mixing together in a saucepan 1 1/2 cups thick cream, 2 cups packed brown sugar, 250 grams butter and 1 1/2 tsps. vanilla extract.

7. When pudding is done. let cool and prick all over with a skewer. Drizzle with caramel sauce and return to the oven for two more minutes.

8. Serve pudding warm with caramel sauce, vanilla ice cream or whipped cream.


Saturday, June 12, 2010

Ricotta blintzes

Ricotta Blintzes


I saw a very attractive picture of Ricotta Blintzes in The Essential Dessert Cookbook (1998, Murdoch Books) and vowed to make them. Problem was, ricotta cheese wasn't readily available in my supermarket. Thankfully, they sold it in Rustan's. I had a choice between buying the imported one and the local ricotta made by this producer called Malagos Farmhouse.I settled for the latter.

According to my cookbook, blintzes are filled pancakes which are Jewish in origin. They are best eaten during breakfast or early dinner. Basically, they are pancakes or crepes filled with cheese mixture and then baked. If you're looking for something new to taste, try it sometime. The husband, who loves cheese, liked it so much ;)

Ricotta blintzes recipe:

1. Preheat oven to 315 F. Sift one cup all-purpose flour. Make a well and in this center, whisk in two eggs and 1 1/4 cups milk (about 315 ml) until batter is smooth and free of lumps. Stir in melted butter, transfer to a container, cover and let stand for 30 minutes.

2. In a greased nonstick pan, pour batter and swirl quickly. Cook until set. Invert unto a plate. Stack crepes between parchment paper or anything grease-proof to prevent them from sticking together.

3. Next, mix 2 oz. raisins in a bowl and add 1 tbsp. liqueur (Grand Marnier or Cointreau). Set aside for 30 minutes. Beat 12 oz (375 g) ricotta, 1/3 cup caster sugar and 2 tablespoons lemon juice for one to two minutes until smooth. Stir in raisin mixture.

4. Heap enough filling on the center of each crepe then fold. Place the crepes, folded side down, in a greased ovenproof dish in a single layer. Brush each crepe lightly with melted butter and put in oven for 10-15 minutes or until hot. Dust with confectioners' or icing sugar before serving.


Thursday, June 03, 2010

Beef bourguignon (beef in red wine, a la Julia Child)


I chanced upon a recipe of beef bourguignon and remembered our trip to Coron, Palawan - one of my favorite places in the Philippines. The dish happen to be offered in Bistro Coron, inarguably the best restaurant in the island. The presence of a bottle of red wine in the house made me decide to finally try the recipe, which was adopted from simplyrecipes using Julia Child's version.

I noticed there are a lot of recipes for beef in red wine sauce (I even consulted my French cookbook) but this version is simply SUPERB! Kudos to Julia and simplyrecipes :) Sauteeing the beef in bacon (and bacon fat) and mixing pearlized onions and mushrooms just as the beef stew is about to be cooked makes all the difference.

Ingredients:

6 pieces of bacon (I used the smoked variety, local brand)
olive oil
beef cubes
salt and pepper
sliced onions
carrots or baby carrots (I used the latter)
about 2 cups of red wine
beef stock
chopped tomatoes
herb bouquet (in its absence, I just added chopped garlic and bay leaf into the boiling pot)
*better if you have herbs like parsley and thyme

more sliced onions
butter
button mushrooms

1. Blanch bacon in boiling water, drain and dry on paper napkins or towels. Slice bacon into one-inch pieces and saute in its own oil. Add olive oil, then brown beef cubes in mixture of bacon fat and oil. Season with salt and pepper. Transfer to a Dutch oven or casserole pan.

2. Add sliced vegetables to the pan and deglaze with wine. Pour enough stock to cover the meat. Add tomatoes, garlic and onion.

3. In a separate pan, saute chopped onions in a mix of olive oil and butter. Add chicken stock or water, brown sugar and season with salt and pepper. Cover and simmer till the onions have absorbed most of the water. Set aaside.

4. Next, saute sliced mushrooms in olive oil and butter.

5. Fold the onions and mushrooms into the simmering stew. Serve with steamed rice, bread or potatoes.Blanch bacon in boiling water, drain and dry on paper napkins or towels

Friday, May 28, 2010

Savory sour cream pork chops recipe


The picture isn't as attractive as it should be, but hubby definitely considers this comfort food. Super-tender pork chops with savory sauce put on top of steaming hot rice is the stuff weekday dinners are made of.

What is good is that the chops were basically just pan-fried a bit and left to simmer in the slow cooker. Busy wives (like moi) can prepare this in the morning, and then the dish can be ready seven to eight hours later, when you return from work. Thanks to allrecipes.com for sharing!

Ingredients:

6 pork chops
salt and pepper to taste
garlic powder to taste
1/2 cup all-purpose flour
1 large onion, sliced 1/4 inch thick
2 cubes chicken bouillon
2 cups boiling water
2 tablespoons all-purpose flour
1 (8 ounce) container sour cream

How to make:

Season pork chops with salt, pepper, and garlic powder, and then dredge in 1/2 cup flour. In a skillet over medium heat, lightly brown chops in a small amount of oil.
Place chops in slow cooker, and top with onion slices. Dissolve bouillon cubes in boiling water and pour over chops. Cover, and cook on Low 7 to 8 hours.
Preheat oven to 200 degrees F (95 degrees C).
After the chops have cooked, transfer chops to the oven to keep warm. Be careful, the chops are so tender they will fall apart. In a small bowl, blend 2 tablespoons flour with the sour cream; mix into meat juices. Turn slow cooker to High for 15 to 30 minutes, or until sauce is slightly thickened. Serve sauce over pork chops.

Saturday, April 18, 2009

Conti's and a Baked Salmon Recipe

Salmon is my favorite food. I've always liked it because it tastes exquisite and is easy to cook as well. An easy recipe is to marinate it in Kikkoman soy sauce and pan-fry in butter. Presto, Ihave an instant meal.


Of course,  if you want dine out, the baked salmon of Conti's coffeeshop is quite popular. A bit of a luxury at P295.... it's a slice of the fish with vegetable sidings and a cup of their tasty paella rice. See photo above.

Recently, I decided to splurge and bought a big chunk of frozen salmon at the supermarket. I wanted  to try out a recipe I found online , using mayonnaise and parmesan cheese. Here's the result:


Here's how to make this Parmesan-baked Salmon:

1. Perheat oven to 400F.

2. Mix 1/4 cup mayonnaise, 2 tbsps. parmesan cheese and 1/8 tsp. ground pepper. Set aside.

3. Take out your salmon fillet and pour the right amount of lemon juice on it. Spread the cheese-mayonnaise mixture on top. Then sprinkle with crushed Ritz crackers, just enough to cover the surface of the fish.

4.Bake for 12 to 15 minutes or until fish is done.

Saturday, March 21, 2009

Tomato and Cheese Fans, from Jacques Pepin


Jacques Pepin is a chef I am just beginning to discover, thanks to The Hubby who likes him so much. During the last vacation, my cool mother-in-law brought home a hard-bound copy of Pepin's "fast Food My Way" and that's how I began to discover more of Pepin's dishes. They're delicious and easy to make. The kind you won't have second thoughts preparing after a hard day at work.

This recipe originally came out as Tomato and Mozzarella Fans in the Pepin book. But since I did not have mozzarella, I used kesong puti (native white cheese) instead. Equally yummy. Perfect as a side dish for fish, chicken or other kinds of meat, and other days when you just want to have a salad ;)

How to make and assemble:

Take a couple of extra large tomatoes and slice in several parts, stopping short of cutting them all the way through. When you've made several cuts, insert the cheese slices in between, until you have what resembles a red and white fan.

For the dressing: Mix in a small bowl 1/4 cup extra virgin olive oil, 1 1/2 tbsps. red wine or sherry vinegar, 1/4 tsp. salt and 3/4 tsp. freshly ground black pepper.

Arrange the tomato on a serving plate. Spoon dressing on top. Put more olive oil on the side, then add diced red onion and chopped basil leaves, if desired.

Saturday, March 07, 2009

Asian soup: misua (mee sua) with meatballs


Misua (variation mee sua) is an Asian type of noodle made with rice flour. It is usually thinner than other varieties like vermicelli. A friend of mine advises cooking misua on your birthday to bring luck for the rest of the year... I still have to try it :)

The misua dish featured above is known in the Philippines as "almondigas." Because I have children, I like cooking it because it is tasty yet very easy to make. It's healthy too, as it doesn't really use oil, and you can add green leafy vegetables , like spinach, if you prefer.

How I cooked this:

1. Boil 2 to 3 cups water.

2. When the pot is already simmering, add prepared meatballs and let it cook. For this one, I used packed meatballs in the supermarket.

3. Season with salt and pepper or other condiments (Like bouillon cubes).

4. Add one pack misua noodles last, while stirring to avoid it from clumping.

5. Top with greens if you like.

6. Serve hot.

This is my entry to SWC: Soups hosted by Tasty Recipes. SWC was started by Cooking Station.

Thursday, March 05, 2009

MoMo at Robinson's Midtown: comfort food

MoMo at Robinson's Midtown always brings positive vibes when I eat there. It is bright and airy. The wi-fi and magazines are free. So are the Choc-nuts. The menu is sparse, but carefully planned and selected. The food is something you'd like to try, again and again. In short, it's a place you'd want to hang out with your friends.

From the viewpoint of this frustrated cook, the dishes at MoMo is also what I would have prepared if I had more time in the kitchen. Take a look at these pictures:


Kung Pao Spaghetti. An Oriental-inspired pasta livened up with oyster sauce and nuts.


Good ol' pasta carbonara. MoMo's version is interesting because it has the yolk of an egg in the middle. Not heart-healthy, but yes, the authentic Italian version of the carbonara does call for egg yolk :)


Four-cheese pizza! A must if , like me, you love cheese!

Overall-rating: no-fuss food that's simply superb. Don't forget the desserts!

Cooking Korean: Baked Fish with Sweet Chili Sauce


I have a confession to make : Korean cuisine is a favorite on my list. Whenever I crave for anything that's up-to-the-wall spicy, you'd find me in a Korean restaurant. Of course for those who prefer something milder, there's always stuff like bulgogi and kalbi jim (beef rib stew). Prepare from P200 to P300 for a single-person visit to a Korean resto. However, it's always worth it since they serve you an array of banchan (Korean appetizers) to add to your meal. Sometimes, you'd get full from these already.

For best results, it is better to go to food joints priding themselves of traditional home cooking. Fastfood "Korean" establishments never interested me. For one, their banchan doesn't come free.

This baked fish with chili sauce is one Korean dish that's easy to make. The gochujang you can buy at the Korean grocery, but go easy on it because it can make the dish really hot.

Recipe from Korean Favorites (Periplus Mini-Cookbooks):

4 tbsps. Korean hot bean paste (gochujang)
1 tbsp. soy sauce
1 tbsp. corn starch, mixed with 2 tbsp. water
1 tsp. sugar
1 tsp. sesame oil
2 spring onions, chopped
2 cloves garlic
2 finger-length cilies, desseded and chopped
1 tsp. minced fresh ginger root
2 tsp. sesame seeds
500 g. white fish fillet

Combine all ingredients and mix well.

Spread mixture over fish fillet. Put in a baking tray and set aside for at least 15 minutes to marinate.

Preheat oven to 360F and bake the fish for five minutes until cooked. Serve hot with steamed rice.

Wednesday, February 25, 2009

Home-made Banana Cue


This is a quite unglamorous picture of a banana cue I made recently at home. I took this shot in the final process of frying the bananas, on the way to our family picnic. This was a successful experiment and it wasn't as hard as I thought.

First, you have to choose a good batch of saba (plaintain) bananas. I would suggest those that are already ripe. Remove the skin and heat cooking oil in a pan (I chose non-stick). When hot enough, begin frying the bananas. When these are almost brown, add the right amount of brown sugar and wait till they caramelize. Take care not to brown the sugar. Turn off heat when caramelized sugar has blended well with the bananas.

My kids loved this. Using the same recipe, some people wrap the banana and make turon (spring roll). They even add extra ingredients like sweetened jackfruit or langka. I guess this is something we'll have to try next time ;)

Just passed this entry to Mama Bear's Make It from Scratch Carnival. Take a look!

Monday, January 12, 2009

Oven-Baked Barbecue Baby Back Ribs


Over the holidays, I had a kick trying out a delicious recipe of oven-baked barbecue baby back ribs. This was one successful experiment since my daughters and I had a whale of a time munching on the bones like crazy. The secret is in the sauce, I must say, and one has to be patient with the long baking time (about 100 minutes). But the results are worth it, finger-lickin' ribs in due time. For an Oriental twist, I paired the dish with mantao or steamed white buns. Kain na! (let's eat!)

A special shoutout to Recipezaar for this recipe:

1. Prepare the following: 2 cups ketchup, 1 small onion (minced), 1 tbsp. minced garlic, four cups water, one cup vinegar, 2 tbsp. paprika, 1 tbsp. honey, 1/4 cup dark brown sugar, 1/4 cup chili powder, 1/4 cup fresh lemon juice, 3 tbsp. Worcestershire sauce, a pinch of black pepper.

2. Bring all these ingredients to a boil stirring occasionally (about 30 minutes.)

3. Let cool.

4. In the meantime, season ribs with salt and pepper and let it sit for 20 minutes before baking.

5. Preheat oven to 350 degrees.

6. Place ribs in a greased baking sheet and begin baking for 30 minutes.

7. Brush ribs generously with the sauce and return to the oven, baking for 20 minutes more.

8. Remove from oven, brush again with the sauce and bake for another 20 minutes.

9. After 20 minutes, repeat the procedure and bake for another 25 to 30 minutes, until 100-minute baking time is achieved.

10. Arrange ribs in a serving platter, and pour with more sauce, if desired.

Wednesday, December 24, 2008

Desserts in our Noche Buena Table


First of all, let me greet friends and bloghoppers a Merry, Merry Christmas!

Let me share some of the desserts in our Noche Buena table last night. Noche Buena is a time-honored Filipino tradition where members of the family eat together a simple or lavish Christmas Eve feast, whichever way you like it. This happens by midnight, usually after hearing Mass. Gifts are distributed or exchanged, also during this time.

As this is our first Christmas in our new home, we put up our own seven-foot Christmas tree and a twinkling parol (lantern) outside. Our Christmas meal, however, was what I would call the "no sweat" noche buena. I passed on working in the kitchen, with a promise to really get-busy in the New Year. Maybe am still just recovering from a much-needed break from work.

So here it is, the desserts on our table:

Gingerbread house - very pretty! I bought this from S & R thinking it's something the kids would admire, and they did! It's completely edible, but we still have to eat it!

The Christmas Cake - most reputable bakeshops sell this. Ours was from Red Ribbon - white frosting decorated with green and red Christmas trimmings.

Leche Flan - A whole round pan from Goldilock's, with a thick custard. My son, who has a sweet tooth, simply loves this.

Chocolates, Ferrero Chocolates - everybody's favorite.

Note : Except for the Gingerbread House, the Sweetheart sent all of these, via online delivery. He wanted to spare me the hassle of cooking and baking, hehe. Not in photo is the ice cream, chilling out in the ref ;)

Tuesday, November 11, 2008

Lunch boxes will never go out of style: what's for Tuesday?


The Filipinomomblog has launched their lunchbox meme, and I would like to unveil what my twin daughters had for baon this Tuesday. Thin as they are, am thankful that my eight-year old twins are not picky eaters. In fact, I'm training their taste buds this early by tagging them along with me on my food trips. Some of their favorite foods are pizza, tocino, sinigang and dishes with malunggay leaves in them.

Another all-time favorite of theirs is pork and beans. They can subsist on a big can during those times when Mom or the nanny is too lazy to cook. Their main course for the lunch box today is what I would call the "pork and beans" casserole. It's good ol' pork and beans given a tasty twist by adding real chunks of meat and cubed potatoes. How to do this? First, I sauteed pork bits with garlic and onions, added a little water and simmered till it was cooked. Then I poured the can of pork and beans, and seasoned with salt and sugar. After which, I added the cubed potatoes and simmered again till potatoes were cooked.

The other things in the lunch box: rice, mixed veggies, Fuji apple and pineapple juice... good enough for my little daughters with the hearty appetite :)

Friday, October 10, 2008

Adobo with Buko Juice


The Adobo Book: Traditional & Jazzed-Up Recipes by Rey Gamboa Alejandro & Nancy Reyes-Lumen is an excellent book on the many variations of our national food. It's interesting how the making of the dish varies by regions and families. Some people have even made their own brilliant inventions with the basic adobo premise.

I'll be trying more recipes from the book, but in the meantime , here's one on pork adobo in buko juice written by Achie Diaz De Rivera. Note that this adobo doesn't use soy sauce. From my own experience, it would be well-advised to season it well. Don't think taste of the juice was recognizable in the final product, though using buko juice is healthy indeed. I would try using pineapple juice too. BUt they'd already call it pork asado in some parts.

How to do:

In a wok, place together one kilo pork spare ribs or belly, minced garlic, 1 tsp. pepper, bay leaf, a tsp. dried oregano and half a nut of the buko juice. Bring to a boil and, without stirring, let simmer over low heat until liquid disappears. Add 1/2 cup oil and toast to golden brown. Scrape the bottom of the wok to loosen the sticking bits and pieces. Remove the excess oil and add the remaining buko juice. Continue cooking until thick gravy is formed.

Serves 4-6.

Sunday, September 28, 2008

Highlanders Brown Rice Tea


Don't know if it goes with age, but I've lately turned a convert for anything herbal or "natural." I've tried using Carica shampoo for my hair, papaya soap and also the Zen Zest line - all of which have brought positive results. One good thing I also subscribe to is Highlanders Brown Rice Tea which is made from - you guessed it - a combination of brown rice and ginseng. It claims to be an all-natural beverage adapted from what has been used by ancient Tibetans to fight the cold up in the mountains.

I have to admit I had to resort to drinking this when I worked on shifts and sleeping sometimes proved to be difficult. Wasn't really that comfortable taking melatonin, another over-the-counter sleep-inducing medicine.A cup before bedtime was enough to calm me down (like chamomile), and no getting up to empty the bladder too! The only drawback to this tea is the price, it costs about twenty five pesos per tea bag. Still, that's much cheaper than having your cuppa at Starbucks or any of those stylish chains.

What brown rice tea claims to bring about: (from its official literature)

- better sleep & stress relief
- greater stamina
- reduced night urination
- stimulation of appetite
- improved digestion
- relieves constipation
- better blood circulation
- detoxification
- improved complexion
-regulation of blood pressure
- reduce tummy bulge

Saturday, September 20, 2008

Beef Gyudon, Home Version


Beef gyudon is what we usually order in Japanese fastfood chains like Yoshinoya and Rai-rai Ken. But did you know it's easy-peasy to make it at home? Except for the mirin and the sake, most of it is already in your pantry at home. Just remember to order super-thinly sliced beef too from your butcher. In Japan, they usually eat gyudon with beni-shoga) but that can be bought at the Japanese grocery too.

These days, I'll try to make pork gyudon too - I think that would be equally delish.

Recipe below is from local chef Heny Sison (she who's made famous with her fabulous cakes). I happened to have been invited by Abenson to attend her cooking class at her spacious cooking school in Makati. So it was a lazy Sunday afternoon of learning all about Japanese cooking ~ again!

For your big bowl of beef gyudon, you'll need:

500 grams white onions
1 cup white wine, or sake
1/2 cup water
500 grams thinly-sliced beef
3/4 cup soy sauce
3/4 cup mirin
4 tbsps. sugar
600 grams cooked rice
pickled ginger or beni shoga, to taste


1. Slice the onions thinly.
2. In a medium-size saucepan, mix sake and water. Bring to a boil. Add the beef slices and simmer for a few minutes. Add 3/4 cup soy sauce, 3/4 cup mirin and 4 tbsps. sugar. Simmer for 3 minutes.
3. Add onions and again simmer until onions are transparent and soft.
4. Prepare hot cooked rice in bowls and add gyudon with the sauce on top. garnish with sweet vinegared ginger.

Baked Fish Fillet with Kesong Puti (Native Philippine White Cheese)


Here's a tried-and-tested fish fillet recipe I got from the Good Housekeeping (Philippines) Cookbook, Volume 4. Cooked this to commemorate Valentine's Day 2008 with the boyfriend..and even though he wasn't here, my officemates loved it. Must have been the cheese. Glad to use kesong puti on this dish, I normally just slather it in my hot pan de sal.

The original recipe called for snapper fillets, but I just used creamy dory since it seems so common in the grocery these days. No problem with that.

You will need:

1/2 kilo fish fillet, trimmed and sliced into four
pepper
100 grans kesong puti
1/4 cup breadcrumbs
1/4 cup olive oil
2 tbsps. oil
2 large tomatoes, sliced
1 small zucchini, thinly sliced

For the Wasabi Cream topping:

1/4 cup wasabi powder
1/4 cup water
1 cup cream 2 tsps. honey

How to Do:

Place fish fillet on a tray and season with pepper. Put kesong puti on top and sprinkle with breadcrumbs. Bake for 15 minutes in a preheated 530F oven.

Prepare vegetables. In a pan, saute sliced tomatoes and zucchini. Season with salt and pepper. Set aside.

Make the wasabi cream by dissolving wasabi powder in water. Add cream and honey. Cook over low heat for 10 minutes.

Serve fish with wasabi cream on top and vegetables on the side.

Rating: simple pero effect! :)

Tuesday, September 16, 2008

A pandan kaya recipe, at last!


I love pandan kaya jam, originally from Singapore and Malaysia. Unfortunately, they're not so common in the Philippines as peanut butter or even matamis na bao or coconut jam. That's why I was glad when I attended a cooking event recently, spearheaded by "gourmetician" Chef Lisa Leong. One very funny lady. And some of the recipes she taught was making pandan cake in the recipe cooker and another called MCT Pandan Kaya. MCT is a brand imported from Singapore and is now available in the Tang City chain of restaurants in Manila.

Here's how to make the MCT Pandan Kaya. At least we'll have an idea how kaya is made:


You will need -

5 large eggs
120 g. warm MCT milk (hot water mixed in 1 sachet MCT powder)
1 tbsp. potato starch (mixed into 2 tbsp. pandan water)
130 g. fine sugar
100 g. hot water mixed in 3 tbsp. concentrated pandan stock
3 pandan leaves (knotted)
4 tbsp. COCOS Pandan coconut oil


1. Stir and whip eggs lightly. Add warm MCT milk and cornstarch solution.

2. Heat saucepan, add fine sugar, hot water and pandan stock. Bring to boil until sugar has well dissolved. Add in pandan coconut oil.

3. Remove pan from heat, whisk syrup mixture into MCT egg mixture quickly. Strain through a sieve. Pour pandan egg mixture back into a double boiler pot and continue to stir. Mix for 5 to 6 minutes.

4. Cover and steam over medium low heat for 6 minutes until slightly set. Continue stirring for every 5 minutes until mixture thickens.

5. When kaya is ready, discard the pandan leaves. Bottle kaya in jars and refrigerate.

- Thanks to Team Asia for the recipe